Those Daring Bakers are at it again! Our challenge this month was hosted by Lis of La Mia Cucina and Ivonne of Cream Puffs of Venice, the ever so talented creators of the DB cult. We also had two honorary hosts, Fran of Apples Peaches Pumpkin and Shea of Whiskful. This challenge has been dedicated to honorary Daring Baker member, Barbara of Winos and Foodies . The recipe that we were being challenged to make was a very traditional as well as very French dessert. One that I have loved on too many occasions when in France, The Opera Cake.
You may be asking yourself, what exactly is an Opéra Cake? Well, it is a cake that is made up of five components: a joconde (a cake layer), a syrup (to wet the joconde), a buttercream (to fill some of the layers), a ganache or mousse (to top the final cake layer) and a glaze (to cover the final layer of cake or of ganache/mousse). Traditionally, it is made with darker flavors, such as chocolate or coffee. This particular challenge we were instructed to keep it light.


When I first read the challenge, I was going to skip this one, it seemed so complicated. Then I got this wild hair to start baking. I made the entire cake on a lovely Sunday afternoon. The recipe was straightforward as well as simple even though there are a lot of steps. The only problem with starting it Sunday afternoon was that by the time was cake set up, I really did not feel like photographing it.
Monday came and went! Tuesday, I knew I had to photograph it, and to share with some friends. I can honestly tell you that even after a couple days the cake was still very moist and flavorful.
The flavors I chose for this Opera Cake:
The Joconde layer – I used the traditional recipe, and did not alter it as I liked the almond base.
The Syrup – I made one using fresh Verbena from our garden, which gave it a fresh lemony flavor.
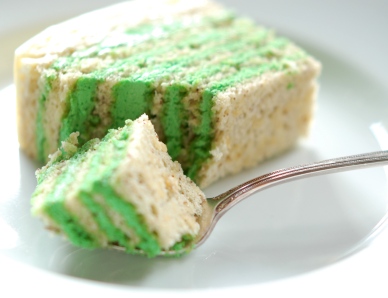
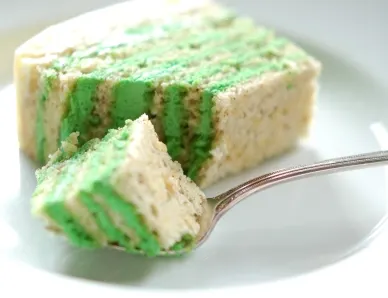
The Buttercream – I flavored with Pandan, which has a great flavor that is hard to describe, it really stands out and is not too bold, just mild. The only thing that I am not happy with concerning the Pandan, is the bright green color. I had wanted this cake to be lighter in color.
The Mousse – I went with a coconut cream and used flaked, unsweetened coconut to flavor it and to give some texture.
The Glaze – I used white chocolate.
What are you waiting for? Challenge yourself and make an exotic Pandan Opera Cake
More Daring Baker’s Oper Cake Recipes to Try
Andrea Meyer’s Mini Opera Cakes
Barbara Bakes Creamsicle Opera Cake
Dessert First Lemon and Lavender Opera Cake
Cannelle et Vanille Apricot, Passion Fruit and White Chocolate Opera Cake
Recipe: Opera Cake
For the Joconde
(Note: The joconde can be made up to 1 day in advance and kept wrapped at room temperate)
What you’ll need:
•2 12½ x 15½-inch (31 x 39-cm) jelly-roll pans (Note: If you do not have jelly-roll pans this size, do not fear! You can use different-sized jelly-roll pans like 10 x 15-inches.)
•a few tablespoons of melted butter (in addition to what’s called for in the ingredients’ list) and a brush (to grease the pans)
•parchment paper
•a whisk and a paddle attachment for a stand mixer or for a handheld mixer
•two mixing bowls (you can make do with one but it’s preferable to have two)
Ingredients:
- 6 large egg whites, at room temperature
- 2 tbsp. (30 grams) granulated sugar
- 2 cups (225 grams) ground blanched almonds (Note: If you do not want to use almond meal, you can use another nut meal like hazelnut. You can buy almond meal in bulk food stores or health food stores, or you can make it at home by grinding almonds in the food processor with a tablespoon or two of the flour that you would use in the cake. The reason you need the flour is to prevent the almonds from turning oily or pasty in the processor. You will need about 2 cups of blanched almonds to create enough almond meal for this cake.)
- 2 cups icing sugar, sifted
- 6 large eggs
- ½ cup (70 grams) all-purpose flour
- 3 tbsp. (1½ ounces; 45 grams) unsalted butter, melted and cooled
How To:
- Divide the oven into thirds by positioning a rack in the upper third of the oven and the lower third of the oven.
- Preheat the oven to 425◦F. (220◦C).
- Line two 12½ x 15½- inch (31 x 39-cm) jelly-roll pans with parchment paper and brush with melted butter.
- In the bowl of a stand mixer fitted with the whisk attachment (or using a handheld mixer), beat the egg whites until they form soft peaks. Add the granulated sugar and beat until the peaks are stiff and glossy. If you do not have another mixer bowl, gently scrape the meringue into another bowl and set aside.
- If you only have one bowl, wash it after removing the egg whites or if you have a second bowl, use that one. Attach the paddle attachment to the stand mixer (or using a handheld mixer again) and beat the almonds, icing sugar, and eggs on medium speed until light and voluminous, about 3 minutes.
- Add the flour and beat on low speed until the flour is just combined (be very careful not to overmix here!!!).
- Using a rubber spatula, gently fold the meringue into the almond mixture and then fold in the melted butter. Divide the batter between the pans and spread it evenly to cover the entire surface of each pan.
- Bake the cake layers until they are lightly browned and just springy to the touch. This could take anywhere from 5 to 9 minutes depending on your oven. Place one jelly-roll pan in the middle of the oven and the second jelly-roll pan in the bottom third of the oven.
- Put the pans on a heatproof counter and run a sharp knife along the edges of the cake to loosen it from the pan. Cover each with a sheet of parchment or wax paper, turn the pans over, and unmold.
- Carefully peel away the parchment, then turn the parchment over and use it to cover the cakes. Let the cakes cool to room temperature.
For the syrup
(Note: The syrup can be made up to 1 week in advance and kept covered in the refrigerator.)
What you’ll need:
- a small saucepan
Ingredients:
- ½ cup (125 grams) water
- ⅓ cup (65 grams) granulated sugar
- 1 to 2 tbsp. of the flavoring of your choice (i.e., vanilla extract, almond extract, cognac, limoncello, coconut cream, honey etc.)
How To:
1. Stir all the syrup ingredients together in the saucepan and bring to a boil.
2. Remove from the heat and let cool to room temperature.
For the buttercream
(Note: The buttercream can be made up to 1 month in advance and packed in an airtight container. If made way in advance, you can freeze the buttercream. Alternatively, you can refrigerate it for up to 4 days after making it. To use the buttercream simply bring it to room temperature and then beat it briefly to restore its consistency.)
(Update Note: The recipe for the buttercream that is listed below was originally based on the original but we had some typos. It’s all very confusing (we’re good at confusing ourselves) but here is the short of it: When testing the buttercream, we tested a modified version (we’re crazy like that!!!) that had 2 cups sugar, ½ cup water, and 1¾ cups butter. Yes. That’s right. 1¾ cups of butter. The eggs remained the same. We ended up with very creamy buttercream. VERY. CREAMY. But we don’t want anyone to be afraid of our modified version so you have the option of using the original version listed below or the quantities we’ve listed here in this note. If you are still confused and want to cry, then please e-mail us and we will comfort you!!! We promise!!!)
What you’ll need:
- a small saucepan
a candy or instant-read thermometer
a stand mixer or handheld mixer
a bowl and a whisk attachment
rubber spatula
Ingredients:
1 cup (100 grams) granulated sugar
¼ cup (60 grams) water
seeds of one vanilla bean (split a vanilla bean down the middle and scrape out the seeds) or 1 tbsp. pure vanilla extract (Note: If you are flavoring your buttercream and do not want to use the vanilla, you do not have to. Vanilla will often enhance other flavors but if you want an intense, one-flavored buttercream, then, by all means, leave it out!)
1 large egg
1 large egg yolk
1¾ sticks (7 ounces; 200 grams) unsalted butter, at room temperature
flavoring of your choice (a tablespoon of an extract, a few tablespoons of melted white chocolate, citrus zest, etc.)
1. Combine the sugar, water, and vanilla bean seeds or extract in a small saucepan and warm over medium heat just until the sugar dissolves.
2. Continue to cook, without stirring, until the syrup reaches 225◦F (107◦C) [*Note: Original recipe indicates a temperature of 255◦F (124◦C), however, when testing the recipe I found that this was too high so we heated to 225◦F and it worked fine] on a candy or instant-read thermometer. Once it reaches that temperature, remove the syrup from the heat.
3.While the syrup is heating, begin whisking the egg and egg yolk at high speed in the bowl of your mixer using the whisk attachment. Whisk them until they are pale and foamy.
4.When the sugar syrup reaches the correct temperature and you remove it from the heat, reduce the mixer speed to low speed and begin slowly (very slowly) pouring the syrup down the side of the bowl being very careful not to splatter the syrup into the path of the whisk attachment. Some of the syrup will spin onto the sides of the bowl but don’t worry about this and don’t try to stir it into the mixture as it will harden!
5.Raise the speed to medium-high and continue beating until the eggs are thick and satiny and the mixture is cool to the touch (about 5 minutes or so).
6.While the egg mixture is beating, place the softened butter in a bowl and mash it with a spatula until you have a soft creamy mass.
7.With the mixer on medium speed, begin adding in two-tablespoon chunks. When all the butter has been incorporated, raise the mixer speed to high and beat until the buttercream is thick and shiny.
8.At this point add in your flavoring and beat for an additional minute or so.
9.Refrigerate the buttercream, stirring it often, until it’s set enough (firm enough) to spread when topped with a layer of cake (about 20 minutes).
For the white chocolate ganache/mousse (this step is optional – please see Elements of an Opéra Cake below)
(Note: The mousse can be made ahead and refrigerated until you’re ready to use it.)
What you’ll need:
a small saucepan
a mixer or handheld mixer
Ingredients:
- 7 ounces white chocolate
- 1 cup plus 3 tbsp. heavy cream (35% cream)
- 1 tbsp. liqueur of your choice (Bailey’s, Amaretto, etc.)
How To:
1.Melt the white chocolate and the 3 tbsp. of heavy cream in a small saucepan.
2.Stir to ensure that it’s smooth and that the chocolate is melted. Add the tablespoon of liqueur to the chocolate and stir. Set aside to cool completely.
3.In the bowl of a stand mixer, whip the remaining 1 cup of heavy cream until soft peaks form.
4.Gently fold the whipped cream into the cooled chocolate to form a mousse.
5.If it’s too thin, refrigerate it for a bit until it’s spreadable.
6.If you’re not going to use it right away, refrigerate until you’re ready to use it.
For the glaze
(Note: It’s best to make the glaze right when you’re ready to finish the cake.)
What you’ll need:
•a small saucepan or double boiler
Ingredients:
- 14 ounces white chocolate, coarsely chopped
- ½ cup heavy cream (35% cream)
1.Melt the white chocolate with the heavy cream. Whisk the mixture gently until smooth.
2.Let cool for 10 minutes and then pour over the chilled cake. Using a long metal cake spatula, smooth out into an even layer.
3.Place the cake into the refrigerator for 30 minutes to set.
Assembling the Opéra Cake
(Note: The finished cake should be served slightly chilled. It can be kept in the refrigerator for up to 1 day).
- Line a baking sheet with parchment or wax paper.
- Working with one sheet of cake at a time, cut and trim each sheet so that you have two pieces (from each cake so you’ll have four pieces in total): one 10-inch (25-cm) square and one 10 x 5-inch (25 x 12½-cm) rectangle.
- Step A (if using buttercream only and not making the ganache/mousse):
- Place one square of cake on the baking sheet and moisten it gently with the flavored syrup.
- Spread about one-third of the buttercream over this layer.
- Top with the two rectangular pieces of cake, placing them side by side to form a square. Moisten these pieces with the flavored syrup.
- Spread another third of the buttercream on the cake and then top with the third square of joconde. Use the remaining syrup to wet the joconde. Spread the remaining buttercream on top of the final layer of joconde and then refrigerate until very firm (at least half an hour).
- Make the glaze and after it has cooled, pour/spread it over the top of the chilled cake. Refrigerate the cake again to set the glaze.
- Serve the cake slightly chilled. This recipe will yield approximately 20 servings.
Step B (if making the ganache/mousse):
- Place one square of cake on the baking sheet and moisten it gently with the flavored syrup.
- Spread about three-quarters of the buttercream over this layer.
- Top with the two rectangular pieces of cake, placing them side by side to form a square. Moisten these pieces with the flavored syrup.
- Spread the remaining buttercream on the cake and then top with the third square of joconde. Use the remaining syrup to wet the joconde and then refrigerate until very firm (at least half an hour).
- Prepare the ganache/mousse (if you haven’t already) and then spread it on the top of the last layer of the joconde. Refrigerate for at least two to three hours to give the ganache/mousse the opportunity to firm up.
- Make the glaze and after it has cooled, pour/spread it over the top of the chilled cake. Refrigerate the cake again to set the glaze.
- Serve the cake slightly chilled. This recipe will yield approximately 20 servings.
Tramadol_Usestecot
Sunday 26th of October 2008
Your Web Site is really wonderful and I bookmarked it. Thank your for the hard work you must have put in to create this wonderful facility. Keep up the excellent work!
John Williams
Tuesday 19th of August 2008
Pretty nice site, wants to see much more on it! :)
AlexM
Saturday 16th of August 2008
Your blog is interesting!
Keep up the good work!
Barbara
Saturday 31st of May 2008
Beautiful cake and very ingenious flavor combination.
Claire
Friday 30th of May 2008
I bet a coconut mousse is great! This is fun with its green.